
Want to use ChatGPT directly inside Microsoft Word? You can now install the official ChatGPT add-in and use AI to summarize documents, rewrite content, create professional meeting notes, and format your documents without leaving Word!
In this step-by-step tutorial, I'll show you how to install and set up ChatGPT in Microsoft Word, along with a practical example of turning a raw meeting transcript into professional meeting notes.
Whether you're using ChatGPT for the first time or looking for new ways to work smarter with Microsoft 365, this integration can help streamline your everyday document tasks.
Watch the Video Tutorial
Prefer to follow along with a video? Watch my complete How to Use ChatGPT in Microsoft Word – ChatGPT Add-in Tutorial below.
In the video, I'll walk you through installing the add-in, connecting your ChatGPT account, and using AI to analyze and update an existing Word document.
What Is ChatGPT for Microsoft Word?
ChatGPT for Word is an official add-in from OpenAI that brings ChatGPT directly into Microsoft Word through a convenient side panel.
Instead of switching between your browser or app and Word, you can work with ChatGPT alongside your document. No more attaching documents and then downloading.
With ChatGPT in Microsoft Word, you can:
Summarize lengthy documents and meeting transcripts.
Draft reports, proposals, and professional correspondence.
Rewrite and improve existing content.
Organize information into headings, lists, and tables.
Identify action items, decisions, and important details.
Edit and format documents using natural-language prompts.
The best part? ChatGPT for Word is available with all ChatGPT plans, including the Free plan, although usage limits and available features may vary.
Step 1: Install the ChatGPT Add-in in Microsoft Word
Let's start by installing the official ChatGPT add-in for Microsoft Word, Excel and PowerPoint.
Open Microsoft Word and create a new document or open an existing one.
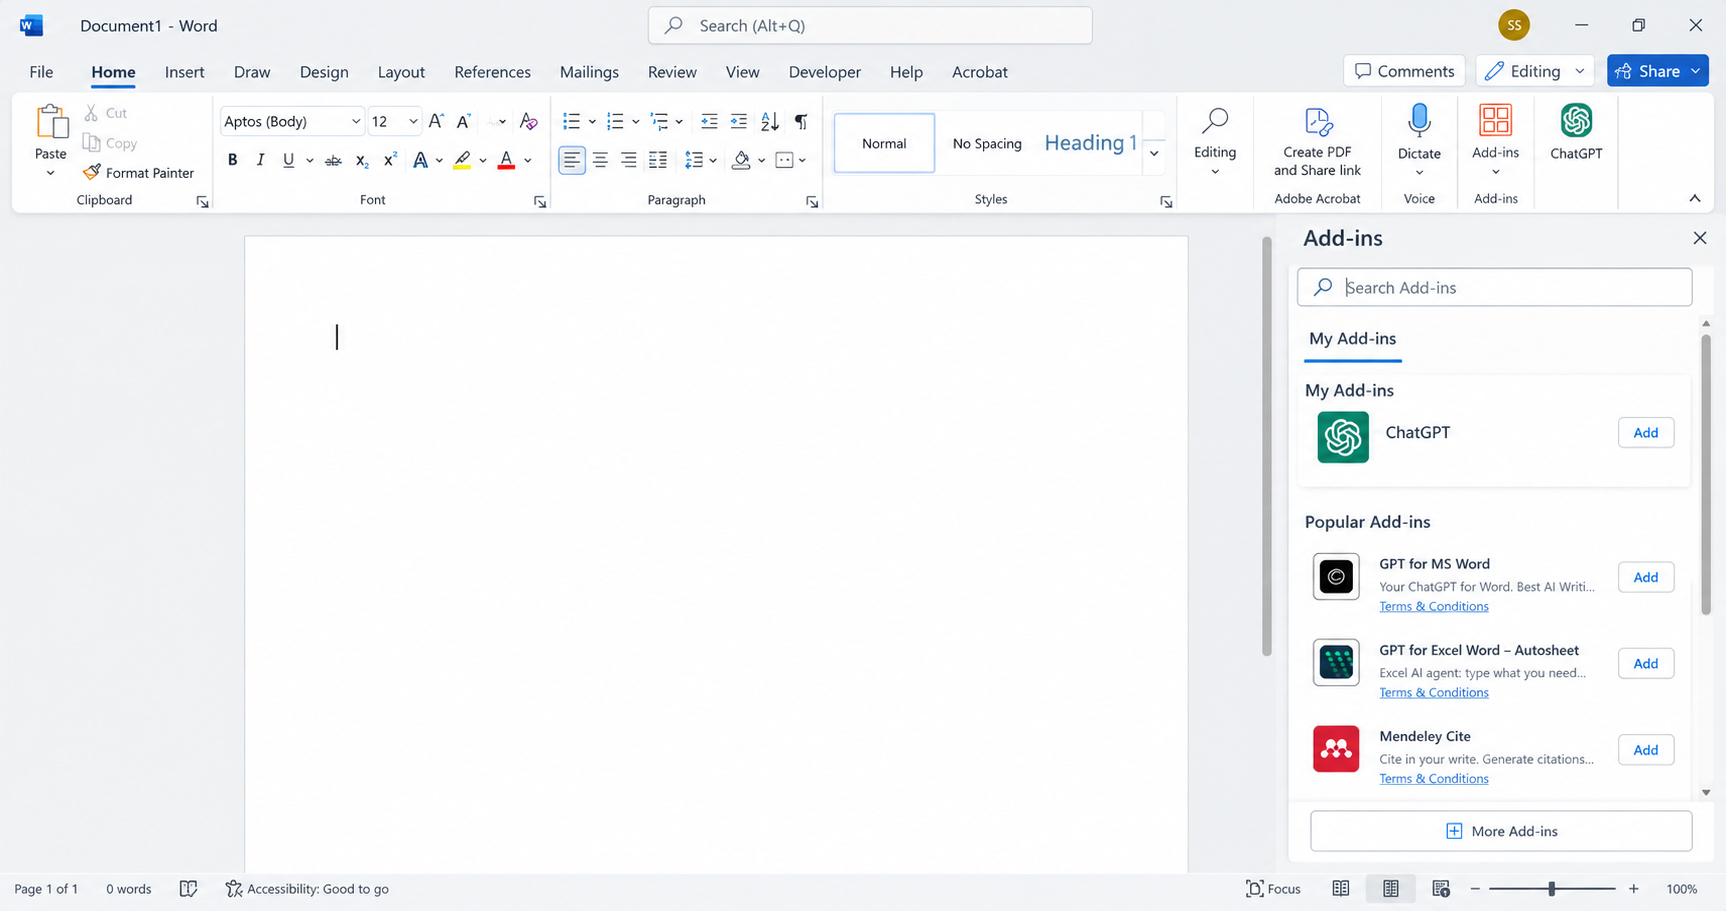
Select the Home tab on the ribbon.
Click Add-ins.
In the search box, type ChatGPT.
Locate the official ChatGPT add-in published by OpenAI.
Click Add and follow any installation prompts.
Once installed, ChatGPT will appear on your Word ribbon.
You can also install the add-in directly from the Microsoft Marketplace.
Tip: If you're using Microsoft Word through your employer, your organization's Microsoft 365 administrator may need to approve the add-in before you can install or use it.
Step 2: Sign In and Set Up ChatGPT in Word
Now that you've installed the add-in, you'll need to connect your ChatGPT account.
Click the ChatGPT button on the Word ribbon.
A ChatGPT side panel will open.
Select the option to sign in to your ChatGPT account.
Review and acknowledge the applicable terms and privacy information.
Complete any additional setup or personalization prompts.
Once you're signed in, you're ready to start working with ChatGPT directly inside Microsoft Word.
Depending on your account and available features, you may also see an option to select which ChatGPT model you want to use.
Step 3: Open a Document You Want ChatGPT to Analyze
For this tutorial, I'm using a real-world example that many professionals can relate to: turning a meeting transcript into organized meeting notes.
Imagine you've just finished a project meeting and have a lengthy transcript containing discussions, decisions, questions, and action items.
Rather than manually reading through the entire transcript and organizing everything yourself, you can ask ChatGPT to help identify the important information.
Start by opening the Word document containing your meeting transcript.
With the document open, click the ChatGPT button to display the side panel.
Step 4: Use ChatGPT to Analyze the Meeting Transcript
Before making changes to the document, I like to start by asking ChatGPT to analyze the information.
This gives me an opportunity to review what ChatGPT identifies before asking it to transform the document.
In the ChatGPT side panel, enter the following prompt:
Prompt 1: Analyze the Meeting Transcript
Review the meeting transcript and identify the key discussion points, decisions made, action items with owners and due dates, project risks or dependencies, and any open questions that require follow-up.
Press Enter to submit your prompt.
ChatGPT will review the document and provide an analysis of the important information.
At this stage, we're simply asking ChatGPT to analyze the content, not change the original document.
This is a useful first step because it helps you identify whether the transcript contains everything you need for your meeting notes.
Step 5: Transform the Transcript into Professional Meeting Notes
Now that ChatGPT has analyzed the transcript, let's take it a step further.
Instead of simply reviewing the analysis in the ChatGPT panel, we're going to ask ChatGPT to transform the open Word document into professional meeting notes.
Enter the following prompt:
Prompt 2: Create Professional Meeting Notes
Use the meeting transcript and the analysis above and transform this document into professional post-meeting notes that I can distribute to the project team.
Include a brief meeting summary, key discussion highlights, decisions made, risks and dependencies, open items, and an action item table with owners and due dates.
Use clear headings and professional formatting.
Submit your prompt and allow ChatGPT to process the document.
ChatGPT can reorganize the content into a more structured format, including headings, summaries, and tables.
In my video demonstration, ChatGPT transforms the original transcript into a formatted meeting notes document with clearly organized sections.
Instead of spending time manually organizing the transcript, you now have a professional draft that you can review and refine.
Tip: Before making substantial changes to an important document, save a copy of the original. This gives you a backup if you need to reference the source transcript later.
Step 6: Review and Edit Your Document Directly in Microsoft Word
One of my favorite things about this integration is that you're still working directly in Microsoft Word.
Once ChatGPT has updated your document, you can continue using all the familiar Word editing and formatting features.
For example, you can:
Adjust fonts, headings, and paragraph spacing.
Apply your organization's document styles.
Update table formatting.
Highlight important information.
Correct or clarify meeting notes.
Add additional details that may have been missed.
You can also continue working with ChatGPT by entering additional prompts to refine specific sections.
For example:
Additional Prompt Ideas
Rewrite the meeting summary to be more concise and professional.
Organize the action items into a table with columns for Action Item, Owner, Due Date, and Status.
Review the document for grammatical errors and inconsistent formatting without changing the meaning of the content.
Identify any action items that do not have an assigned owner or due date.
The more specific your instructions, the easier it is for ChatGPT to understand the results you're looking for.
Step 7: Verify AI-Generated Information Before Sharing
While ChatGPT can be a valuable productivity tool, it's important to remember that AI-generated content should always be reviewed before it's distributed.
This is especially important when working with meeting notes, project documentation, client information, or other business records.
Before sharing your document, verify that:
Important discussion points and decisions are accurately represented.
Action item owners and due dates are correct.
No important information has been omitted.
ChatGPT hasn't introduced details that weren't included in the original transcript.
The formatting and language are appropriate for your intended audience.
Important: If you're working with company or client information, make sure you're following your organization's policies for using AI with business data.
Also, remember that the ChatGPT add-in can access document content to perform the tasks you request. Review your organization's security and data privacy requirements before using it with sensitive information.
Bonus: Use the ChatGPT Add-in in Excel and PowerPoint
Here's another great feature!
The official ChatGPT Microsoft add-in isn't limited to Word. The same add-in also works with Microsoft Excel and PowerPoint.
Once you've installed it, you can open Excel or PowerPoint and look for ChatGPT in the ribbon or under Add-ins.
You can then use ChatGPT to assist with tasks such as analyzing spreadsheet data, working with formulas, or creating and editing presentations.
This makes it possible to bring ChatGPT into several of the Microsoft 365 applications you may already use every day.
Frequently Asked Questions About ChatGPT in Microsoft Word
Is ChatGPT for Microsoft Word free?
The official ChatGPT add-in is available with ChatGPT Free and paid plans. However, usage limits apply, and certain models or features may require additional usage allowances or credits.
Do I need a separate ChatGPT account?
You'll need to sign in with your ChatGPT account to use the add-in. If you don't already have an account, you can create one at ChatGPT.
Can ChatGPT edit my Word document directly?
Yes! ChatGPT can help revise, reorganize, and format content within your open Word document. However, complex formatting and tables may require additional manual adjustments.
Can I use ChatGPT in Word with my work account?
That depends on your organization's Microsoft 365 and ChatGPT workspace settings. Some employers restrict which add-ins employees can install.
Does ChatGPT for Word also work in Excel and PowerPoint?
Yes. The official ChatGPT add-in supports Microsoft Word, Excel, and PowerPoint, so you don't need to install a separate add-in for each application.
Final Thoughts: Work Smarter with ChatGPT in Microsoft Word
The ChatGPT add-in for Microsoft Word makes it easier to incorporate AI into your everyday document workflows.
Whether you're summarizing meeting transcripts, creating reports, drafting business correspondence, or improving document formatting, you can now work with ChatGPT directly inside Word.
And as you saw in this tutorial, you don't need complicated prompts to get started. Simply describe what you want ChatGPT to do, review the results, and continue refining your document.
Want to see the entire process in action? Watch my How to Use ChatGPT in Microsoft Word – ChatGPT Add-in Tutorial.
If you found this tutorial helpful, be sure to subscribe to my YouTube channel for more practical tutorials on Microsoft 365, ChatGPT, AI tools, and workplace productivity.
Work smarter, save time, and build practical tech skills for work and career growth!
— Sharon Smith
#MicrosoftAmbassador #ChatGPT #MicrosoftWord #Microsoft365 #AIProductivity